The SkanPoint module facilitates the creation of bar-coded client ID cards for any client receiving services from a ServicePoint provider. The ID card can then be scanned by other providers in the ServicePoint database to quickly and accurately document services rendered to the client. SkanPoint can also generate cards in bulk for clients who are grouped together in a client list or simply all the clients in the database. A couple of examples of use may be: 1) using SkanPoint to generate ID cards for bedlists in ShelterPoint, 2) using SkanPoint to create ID cards for lists of clients who receive a particular service, such as meals at a food bank, and 3) easily adding the services through an automated routine.
Using SkanPoint
Access SkanPoint from the side menu.

Click the SkanPoint tab in the left hand menu to move into SkanPoint. (1)

The primary SkanPoint screen will display. From this screen, the user may click any of the tab headings to move into the corresponding areas:
- Provide Service – The default area, used to add one service to a scanned client.
- Multiple Services – Add multiple services to each scanned client.
- Add Shelter Stay – Add a shelter transaction to a scanned client.
- Manage Client Lists – Used to add and maintain client lists.
- Generate ID Cards – Print ID cards for clients or lists of clients.
SkanPoint – Provider Services
After entering SkanPoint, remain on the default tab (Provider Services) to enter a service for each client who will be scanned, or for each client included in a list. (See Figure 1)

Complete the fields that make up the service transaction.
- Provider – The field defaults to the user's current provider. To change the provider click Search (1) to locate a provider using the standard ServicePoint provider lookup, or click My Provider (2) to reset the provider to the default. Click Clear to reset the field. (3)
- Service – Select the service that will be added to every client. Choose from the picklist (4) or click Lookup (5) to choose a service from the AIRS taxonomy. (The lookup functionality is explained in the Service Transactions area of the help file. Click Remove to reset the service field. (6)
- Service Start Date – Add a date and time.
- Service End Date – Add a date and time.
- Provider Specific Service – Select from the picklist to note a Provider Specific Service.

The bottom of the Provider Services screen includes the Funding Source area. (1) Complete the fields that make up the service transaction.
- Source – If a source does not exist, click Add Source to add a funding source. (2)
- Unit Type – Select from the picklist.
- Cost of Unit – Enter the cost of the transaction.
- Units – Enter the number of units in the transaction.
- Service Notes – Add notes to capture additional information about the transaction.
If the user would like to save the current scanned list for future use, then add a name in the Enter Client List Name field. (3)
Click Start Skan to begin scanning user ID cards. (4)

Place the cursor in the Skan Code field and begin scanning. (1) As each Client ID is entered, the client name and ID will display in the Clients Entered area. If a bar code reader is not available, Client IDs may be typed from a key board. Click Skan Bar Code to enter the ID. (2) Repeat this step until all clients have been scanned.

As each client is scanned, the household screen will display. From this screen adjust the household by editing household members, adding a client to the household, or starting a new household. These functions are explained in the Client Households section of the help file (under the ClientPoint section).
To add household members to the scanned list, check the appropriate check box (1) and click Save. (2) Click Cancel to close the household screen. (3)

If the wrong client is scanned or entered, click Remove Last Entry to remove the client from the list. (1)
Notice that the last transaction for the most recently scanned client is displayed on the screen (in this example the client did not have a transaction). (5)
If scanning is complete for this service, click Enter Services for Clients. (2) This action will return the user to the Provider Services screen. The added service may be reviewed in the Service Transactions section of ClientPoint for the clients who received the service.
To save the list and start a new scanning session, click Enter Service & Create New Session. (3)
Click Cancel (4) to return to the Provider Services screen without adding the service.

When the service is set up on the Provider Services screen, click Choose Clients from Client List (1) to review and select a client list.

The Select Client List screen will display. Click the Green Plus icon to select a list. (1) Click the Red X icon to remove a list from the system. (2) Click Exit to return to the previous screen without selecting a list. (3) When a list is chosen, the Select Clients screen will display.

Check the check boxes next to the clients who will receive a transaction. (1) Use Check ALL Clients or Clear ALL Clients if appropriate. Click Enter Services for Clients to apply the service transactions. (2) Click Cancel to return to the previous screen without adding the service transactions. (3)

When the service is set up on the Provider Service screen, click Choose Clients from Unit List to review and select a unit (bed) list. (1)

The Select Unit List screen will display. First, assign a provider using Search. (1) Click My Provider to reset the provider entry to the user's provider. (2) Click Clear to reset the provider field. (3) After the provider is in place, select a Unit List from the picklist. (4) Click Submit to affirm the selection and view the clients in the list. (5) Click Cancel to return to the previous screen without selecting a list. (6) When a list is chosen, the Select Clients screen will display.

Click the check-boxes next to the clients who will receive a transaction. (1) Use Check ALL Clients or Clear ALL Clients if appropriate. Click Enter Services for Clients to apply the service transactions. (2) Click Cancel to return to the previous screen without adding the service transactions. (3)
SkanPoint – Multiple Services
Click the Multiple Services tab to move into this area.
![]()
Please read the on-screen warning.

(Be sure to select the correct provider before entering data in the Service List. If you change the Provider, the page will refresh to make adjustments for the new Provider's Service List defaults. Any data that is currently in the Service List will be removed and will need to be re-entered.)
As described in the note above (and on the SkanPoint Multiple Services screen), the Service List is generated based on the provider's Multiple Services Settings that are constructed in Admin Providers Configuration, which can be found in the Admin Dashboard under Provider Preferences.
The provider defaults to the user's current provider. To change the provider click Search to locate a provider using the standard ServicePoint provider lookup, (1),or click My Provider to reset the provider to the default. (2) Click Clear to reset the field. (3)

Use Set All to set Number of Services and Status for every service in the list. (1)
The Service List contains the following fields:
- Number of Services – Enter the number of service transactions to be added for this service.
- Service – Select a service from the picklist.
- Start Date – Add a date and time.
- End Date – Add a date and time.
- Provider Specific Service – Select from the picklist to note a Provider Specific Service.
- Status – Select from the picklist.
- Outcome – Select from the picklist.
- If Not Met Reason - Select from the picklist.
In the Funding Source area enter the following fields:
- Source – If a source does not exist, click Add Funding Source to add a funding source. (2)
- Number of Units – Enter the number of units in the transaction.
- Unit Type – Select from the picklist.
- Cost of Unit – Enter the cost of the transaction.
Click Remove to delete the transaction from the Service List. (3) Click Clear to reset all of the service transaction fields. (4)
Complete a service in the Service List for each service transaction to be added to every client.
At the bottom of the Service List the user has additional options:

- Add Another – Click Add Another to add another service transaction to the Service List. (1)
- Remove All – Click Remove All to delete all transaction from the Service List. (2)
- Clear All – Click Clear All to reset all fields in all transactions. (3)
Click Start Scan to begin scanning user ID cards. (4)

Place the cursor in the Skan Code field and begin scanning. (1) As each Client ID is entered, the client name and ID will display in the Clients Entered area. If a bar code reader is not available, Client IDs may be typed from a key board. Click Skan Bar Code to enter the ID. (2) Repeat this step until all clients have been scanned.

As each client is scanned, the household screen will display. From this screen adjust the household by editing household members, adding a client to the household, or starting a new household. These functions are explained in the Client Households section (under ClientPoint) of the help file.
To add household members to the scanned list, check the appropriate check box (1) and click Save. (2) Click Cancel to close the household screen. (3)

If the wrong client is scanned or entered, click Remove Last Entry to remove the client from the list. (1)
Notice that the last transaction for the most recently scanned client is displayed on the screen (in this example the client did not have a transaction). (5)
If scanning is complete for this service, click Enter Services for Clients. (2) This action will return the user to the Multiple Services screen. The added service may be reviewed in the Service Transactions section of ClientPoint for the clients who received the service.
To start a new scanning session for the same services, click Enter Service & Create New Session. (3)
Click Cancel to return to the Multiple Services screen without adding the service. (4)

When the multiple services are set up on the Multiple Services screen, click Choose Clients from Client List to review and select a client list. (1) The Select Client List screen will display.

Click the Green Plus icon to select a list. (1) Click the Red X icon to remove a list from the system. (2) Click Exit to return to the previous screen without selecting a list. (3) When a list is chosen, the Select Clients screen will display.

Check the check-boxes next to the clients who will receive a transaction. (1) Use Check ALL Clients or Clear ALL Clients if appropriate. Click Enter Services for Clients to apply the multiple transactions. (2) Click Cancel to return to the previous screen without adding the service transactions. (3)

When the multiple services are set up on the Multiple Service screen, click Choose Clients from Unit List (1) to review and select a unit (bed) list. The Select Unit List screen will display.

First, assign a provider using Search. (1) Click My Provider to reset the provider entry to the user's provider. (2) Click Clear to reset the provider field. (3) After the provider is in place, select a Unit List from the picklist. (4) Click Submit to affirm the selection and view the clients in the list. (5) Click Cancel to return to the previous screen without selecting a list. (6) When a list is chosen, the Select Clients screen will display.

Check the check boxes next to the clients who will receive the multiple transactions. (1) Use Check ALL Clients or Clear ALL Clients if appropriate. Click Enter Services for Clients to apply the service transactions. (2) Click Cancel to return to the previous screen without adding the multiple service transactions. (3)
SkanPoint – Add Shelter Stay
The next major tab in SkanPoint is Add Shelter Stay.
![]()
Click the Add Shelter Stay tab to move into this area.

On the Add Shelter Stay screen assign a provider using Search. (1) Click My Provider to reset the provider entry to the user's provider. (2) Click Clear to reset the provider field. (3)
After a provider is selected, click Check Unit Availability to review the provider's unit lists. (4)

Click Exit to return to the Add Shelter Stay screen. (1)

After reviewing unit availability, select the Unit List from the drop down menu. (1) Add a Start Date and time. (2) Then select either:
a: ServicePoint assigns next available Unit, which will cause each scanned client to be placed into the next available bed; (3) or
b: ServicePoint assigns ALL to Overflow Units, which will result in each client being assigned an Overflow bed. (4)
Click Start Scan to begin the scan process. (3)

Place the cursor in the Skan Code field and begin scanning. (1) As each Client ID is entered, the client name and ID will display in the Clients Entered area. If a bar code reader is not available, Client IDs may be typed from a key board into the Skan Code field. Click Skan Bar Code to enter the ID. Repeat this step until all clients have been scanned or entered. (2)

As each client is scanned, the household screen will display. From this screen adjust the household by editing household members, adding a client to the household, or starting a new household. These functions are explained in the Client Households section of the help file (under the ClientPoint section).
To add household members to the scanned list, click the appropriate checkbox (1) and click Save. (2) Click Cancel to close the household screen. (3)

If the wrong client is scanned or entered, click Remove Last Entry (1) to remove the client from the list.
Notice that the last transaction for the most recently scanned client is displayed on the screen. (in this example the client did not have a transaction) (5)
If scanning is complete for this Shelter Stay, click Enter Services for Clients. (2) This action adds the shelter stays to the database and returns the user to the Provider Services screen (the Provider Services screen will remain populated with the previously entered data.) The added service may be reviewed in the Service Transactions section of ClientPoint for the clients who received the stay.
Click Enter Service & Create New Session to add the shelter stays in the database and returns the user to the Provider Services screen. (3) (the Provider Services screen will be cleared of the previously entered data)
Click Cancel to return to the Provider Services screen without adding the service. (4)
SkanPoint – Manage Client Lists
The next major tab in SkanPoint is Manage Client Lists..
Click the Manage Client Lists tab to move into this area. The current provider's client list will display.
Click the Red Minus icon to delete a client list. (1) Click the Edit icon to modify a client list. (2) Click Create New Client List to build a list. (3)
SkanPoint - Modify a Client List
After clicking the Edit icon on the Manage Clients Lists screen, the Client List screen will display.
In the Client Search area the Last ID Scanned displays the last ID entered into the list. (1)
In Type or Scan Client ID, enter an ID to be added to the list. (2) Click Add New Client to List to add the client to the list. (3) This will cause the Client Name to display in the Client List area of the screen.
If a Client ID is not known, click Search to locate a client using the Client Search. (4)
On the Client Search screen enter a First Name, Last Name, Alias, Client ID, and/or a Social Security Number and click Search to generate a list of clients who match the entered criteria. (1) Click Clear to reset the search fields. (2)

From the Search Results click the Green Plus icon to add the client to the list. (1) This action will return the user to the previous screen. Click the Red X icon to delete the client from the database. (2) Click Exit to return to the previous screen without selecting a client. (3)

After a client is selected from the Search Results, the Client Name and ID will display. (1) Click Add New Client to List to enter the client in the list. (2)
To remove a client from the list, click the Red Minus icon. (3)
Click Exit to return to the Manage List screen. (4)
SkanPoint – Create a Client List
Create a client list from the Manage Client Lists screen.
Click Create New Client List to start a new list. (1)
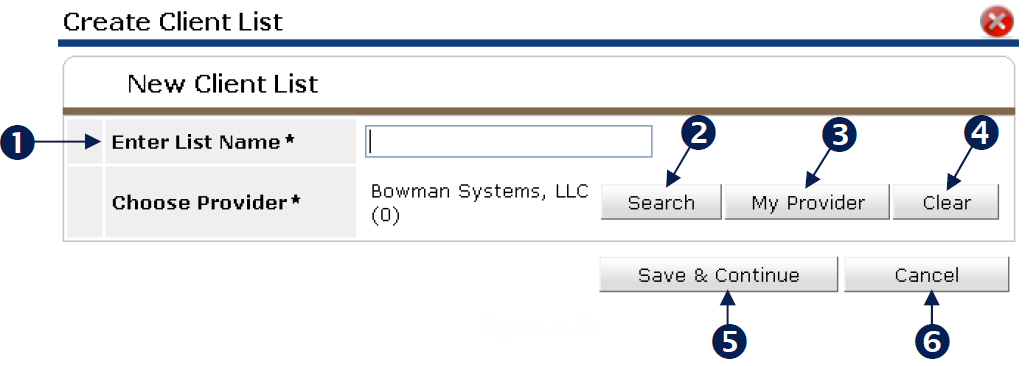
The Create Client List screen displays, name the new list by placing a name in Enter List Name. (1)
Select a provider to which the list will be assigned. The field defaults to the user's current provider. To change the provider click Search (2) to locate a provider using the standard ServicePoint provider lookup, or click My Provider (3) to reset the provider to the default. Click Clear to reset the field. (4)
Click Save & Continue to build the list. (5) Click Cancel to return to the previous screen without creating a list. (6)
An empty Client List screen will display.
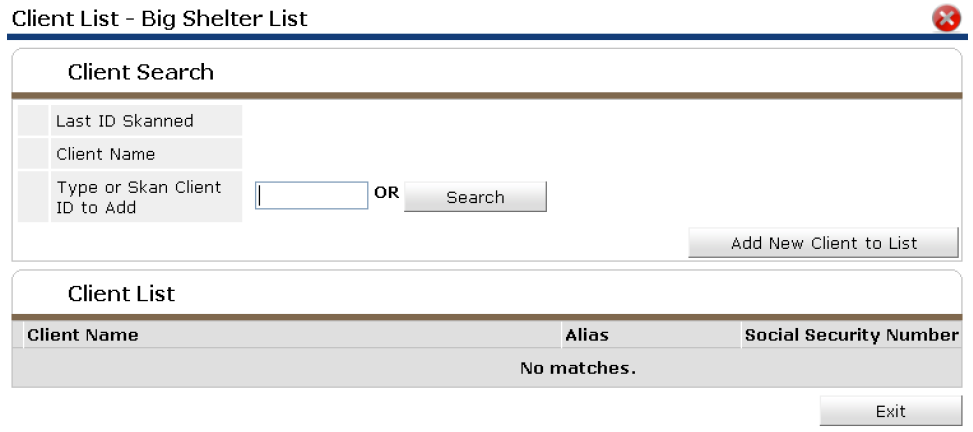
In the Client Search area the Last ID Scanned (1) will display the last ID entered into the list.
In Type or Scan Client ID, enter an ID to be added to the list. (2) Click Add New Client to List to add the client to the list. (3) This will cause the Client Name to display in the Client List area of the screen.
If a Client ID is not known, click Search to locate a client using the Client Search. (4)
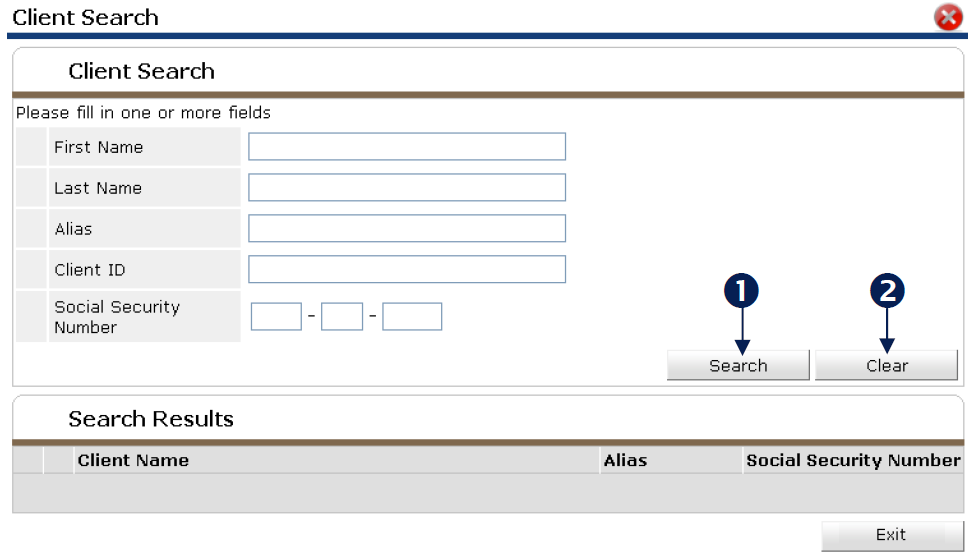
On the Client Search screen enter a First Name, Last Name, Alias, Client ID, and/or a Social Security Number and click Search to generate a list of clients who match the entered criteria. (1) Click Clear to reset the search fields. (2)
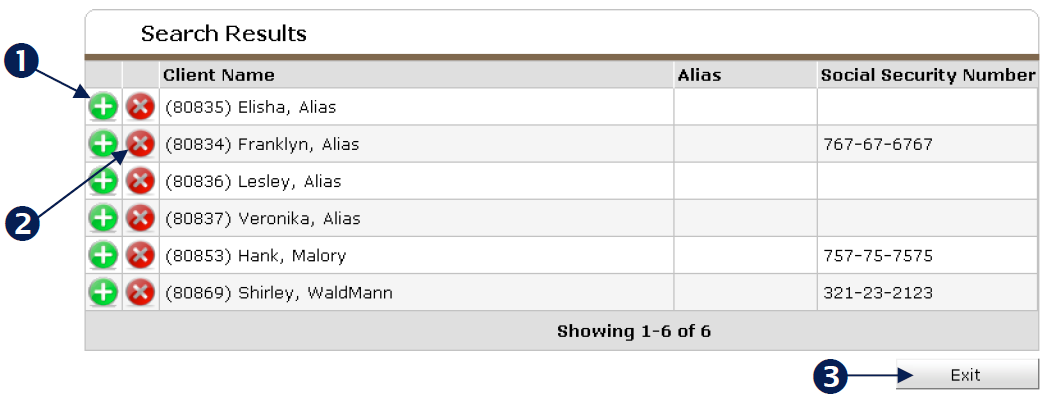
From the Search Results click the Green Plus icon to add the client to the list. (1) This action will return the user to the previous screen. Click the Red X icon to delete the client from the database. (2) Click to return to the previous screen without selecting a client. (3)
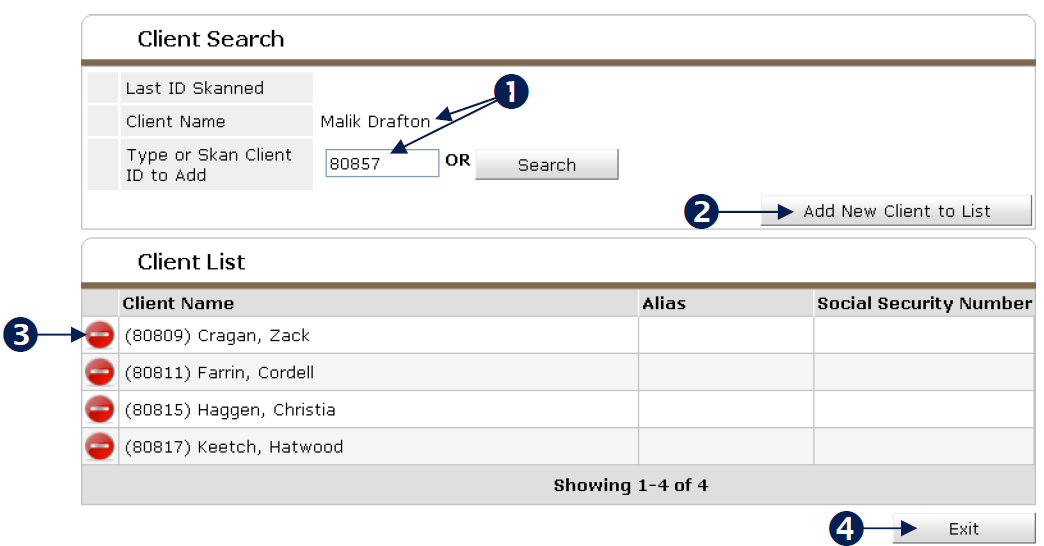
After a client is selected from the Search Results, the Client Name and ID will display. (1) Click Add New Client to List to enter the client in the list. (2)
To remove a client from the list, click the Red Minus icon. (3)
.
Click Exit to return to the Manage List screen. (4)
SkanPoint – Generate ID Cards
The next major tab in SkanPoint is Add Shelter Stay.

Click the Generate ID Cards tab to move into this area. The current provider's client lists will display.

Click the Green Plus icon to print ID cards for clients in the selected list.
Click Generate ALL ID Cards to print ID cards for all clients in every list.
When printing ID cards from a list, the Client List will display.

Check the Check Boxes of the clients that need an ID card. Click Check ALL Clients to set all check boxes. Click Clear ALL Clients to clear all check boxes.
Click Print ID Cards for Clients to initiate the print. Click Cancel to return to the previous screen without printing cards.
For further questions on SkanPoint, please email the Help Desk at helpdesk@allchicago.org